Category Archives: Cooks, Chefs, and Kitchen Hacks

People who feed people.

Yucca Alchemy: Chewy, Cheesy, Brazilian Cheese Rolls (Pão de Queijo)


IMG_4940 (1)

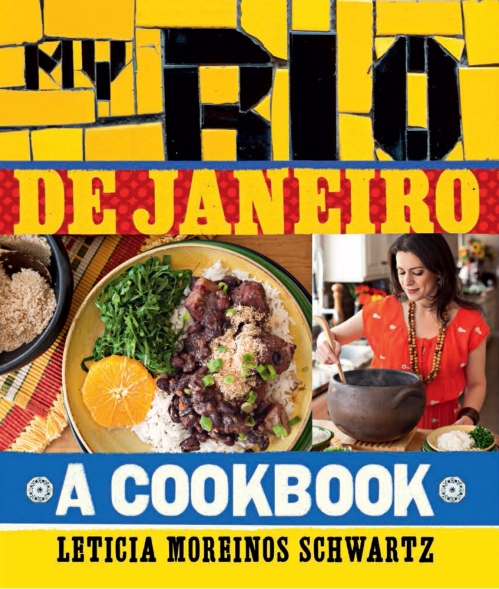
From My Rio de Janeiro: A Cookbook, by Leticia Moreinos Schwartz, published by Kyle Books, 2013.


Since I returned from Brazil, I have been obsessed with pão de queijo or Brazilian cheese rolls. In search of the best recipe, I turned to chef and cookbook author Leticia Moreino Schwartz,  who has been making pão de queijo since  she was a little girl.   In her wonderful book, My Rio de Janeiro: A Cookbook, Leticia aptly describes pão do queijo as a “golf sized little roll that is chewy, cheese, and steamy, almost succulent…the result of yucca alchemy…. it’s quite difficult to eat just one.”

Made with sour manioc (tapioca) starch which is extracted from yucca (aka manioc or cassava),  Pão de queijo is the national bread of Brazil and can be found all over the country; eaten at all times of the day:  slathered with butter for breakfast; enjoyed with cup of coffee for an afternoon snack, or served as a side with dinner. When I asked Leticia to tell me a story about a time she made it for a celebration she said ” I make pão de queijo for every party!”

Pão de queijo is ideal to make for big gatherings because the dough can be easily made ahead and frozen in big batches.  “This is what made it viable to take the little cheese ball from our grandmother’s oven to a global scale,” she said adding, “Today pão de queijo is available all over the world!” You can buy mixes or pre-made and frozen in many different flavors. But of course, the best are made at home and eaten “one minute after they come out of the oven.”

Big Batch Notes: The best way to make pão de queijo for a crowd to make the dough ahead of time,  roll it into balls and put on a sheet pan to freeze (lined with parchment paper or silpat). Once the balls are frozen, place them into a plastic bag.  Then shortly before the event, you can bake the rolls directly from the freezer for about 12-20 minutes (depending on the oven and the size of your rolls) until puffy and golden brown.

Special ingredients: The secret ingredient is povilho azedo also known sour manioc starch, different from sweet manioc starch.  Although I have made mine with tapioca starch, to make truly authentic pãao de queijo you will need to use this ingredient, for which there is no American brand but can be easily purchased on available on Amazon.  Leticia recommends the Yoki brand. (For more information about this ingredient, see below).


final RIO US front cover (1)

Pão de Queijo

Recipe by Leticia Moreinos Schwartz

Brazilians have a fierce love affair with pão de queijo. From Belém do Pará in the north of the country to Rio Grande do Sul, in the south, and anywhere in between, pão de queijo has the power to ignite conversations and direct dinner habits.

In Rio, you will find pão de queijo all over town. Accompanied by a cafezinho on a side in the middle of the afternoon, this habit definitely keep cariocas happy. Another common way of finding pão de queijo is in restaurants, especially in churrascarias, pão de queijo is served in a little basket as part of the couvert. That alone can change the destiny of your menu ordering. If that basked is full of a precious one, the restaurant owner should think twice about serving it. At Esplanada Grill, a fine churrascaria in Ipanema, I have to do a little bit of transcendental meditation before a visit since their pão de queijo is simply spectacular! That’s the inspiration for this recipe.


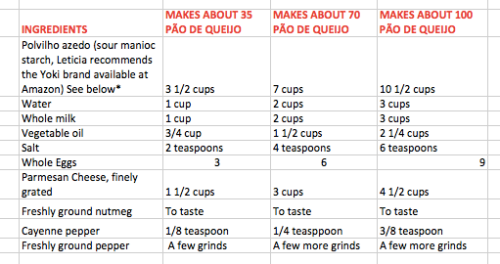
Screen Shot 2014-04-15 at 1.21.27 PM

1.     Place the manioc starch in the bowl of an electric mixer fitted with the paddle attachment. Set aside.

2.     Place the water, milk, oil, and salt in a small saucepan, and bring to a boil. Immediately pour the hot liquid mixture in one stroke into the starch and turn the machine on at low speed. Mix until the dough is smooth and starch is all incorporated, about 2 minutes. Pause the machine and add the eggs. Continue to paddle at low speed until the dough develops structure and turns pale yellow about 5 minutes. The dough will feel sticky.

3.     Add the cheese and mix until well incorporated.

4.     Season to taste with nutmeg, cayenne, and freshly ground pepper.

5.     Transfer the dough to a bowl, cover with plastic wrap, and chill for at least 2 hours in the refrigerator.

6.     Preheat the oven to 350˚F. Line a baking sheet with parchment paper.

7.     Wet your hands with olive oil (alternatively, you can flour your hands with manioc starch) and use an ice cream scooper to make 1-inch balls, rolling them with your hands. Place them on the baking sheet, leaving about 11Ž2 to 2 inches between each (you can freeze them at this point by storing them in a zip-lock bag for up to 3 months).

8.     Bake the cheese rolls in the oven until they puff up and look lightly golden brown, about 12 to 14 minutes. To ensure even baking, rotate the pan once during baking time.

9.     Remove the baking sheet from the oven and place the rolls in a basket lined with a nice cloth. Serve immediately while they are still at their warmest and chewiest.


*Manioc (Tapioca) Starch

Manioc Starch (povilho doce) and sour manioc starch (povilho azedo) are both extracted from yucca (aka manioc or cassava). When it comes to manioc and tapioca starch, it can get very confusing because different American brands call these products different names.

Povilho Doce (manioc starch or sweet manioc starch):

Goya calls it Tapioca Starch, but Bob’s Red Mill calls it Tapioca Flour, and I call it manioc starch in this book.

Povilho Azedo (sour or fermented manioc starch):

No American brand makes the Brazilian equivalent of sour manioc starch (at least not yet), so when a recipe calls for this ingredient, do not substitute for an American brand. I recommend Yoki or Gloriasul brands both available on Amazon.

Farinha de mandioca (manioc flour):

Although this flour is also extracted from the yucca vegetable, the process is completely different from making starch. Here, the yucca vegetable is not washed but ground, then squeezed in a cloth to eliminate any vegetable juices, sieved, and lightly toasted. Think of it as breadcrumbs. Farinha de mendioca is used to make another important staple of Brazilian cuisine: farofa.


Leave a comment

Filed under Big Feeds & Feasts, Cooks, Chefs, and Kitchen Hacks, Recipes

Brazilian (Bahian) Balls of Fire

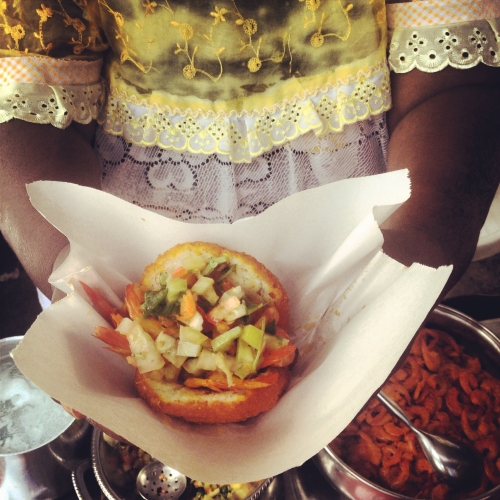
acaraje in hand

During Carnaval, in the town of Salvador in Bahia Brazil,  people literally dance in the streets. The city is filled with the sounds of Brazilian pop music and Afro-Brazilian rhythms–Diana Mercury, Lepo Lepo, Olodun, mixed in with a little Michael Jackson and Daft Punk. At makeshift stands, Bahians grill skewered meat, toast cheese sticks, and slather corn on the cob with butter. Street food is how you feed your people during a festival that runs for 5 days (and nights!) and attracts over 2 million revelers.

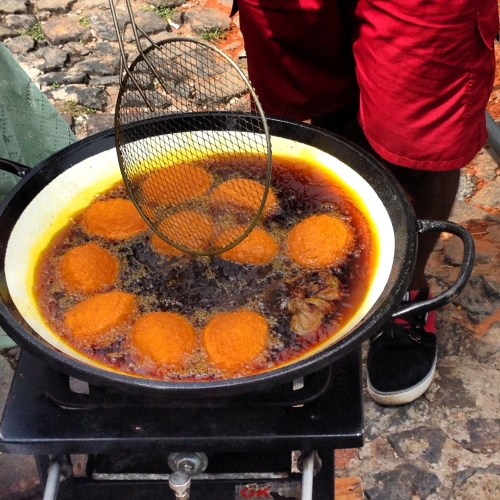
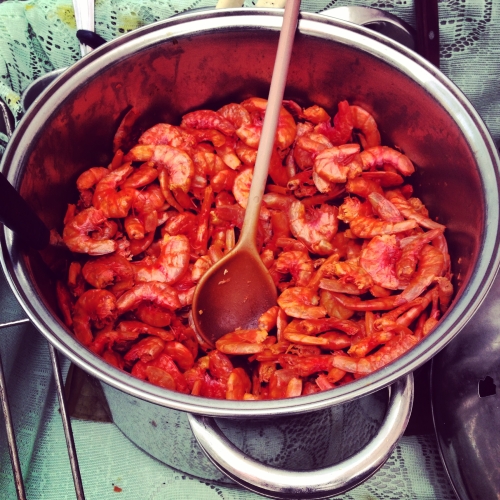
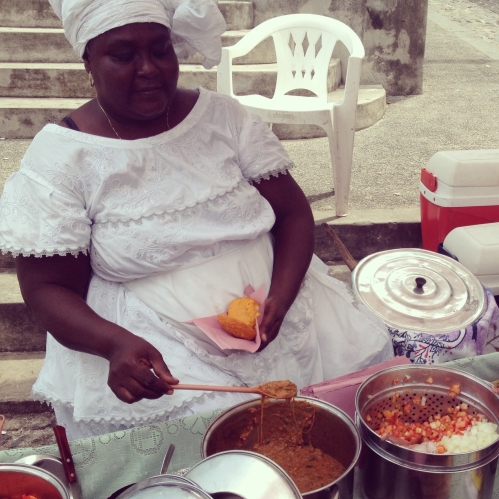
All over the city, ladies wearing white dreses and head wraps (aka Baianas) sell acarajé (Portuguese pronunciation: ( listen)), a fritter made from black-eyed peas deep and fried in palm oil often split and stuffed with shrimp, chopped tomatoes, stewed okra and super-spicey hot sauce. The dish originated in West African, brought to to Brazil during the slave trade.  The name comes from the Yoruba language âcara (ball of fire) and je (to eat), hence to eat a ball of fire. 

frying acarajes

Acaraje is a sacred food, one of the  traditions of Candombléan Afro-Brazilian religion. While the religion is far too complex to describe here,* there is one powerful God  Oludumaré who is served by less powerful deities called orishas, each embodying different natural forces and human characteristics.  Candomble is largely an oral tradition and practiced in secret, so the descriptions and names for the orishas vary (and can be confusing) but according to one source acarje is the ritual food of lansa, “the orisha of the winds, hurricanes and tempests who lives at the gate of the graveyard, and has dominion over the realm of the Dead.”  In another ritual,  the first cake is offered to Èṣù “the spirit of chaos and trickery who leads mortals to temptation and possible tribulation in the hopes that the experience will ultimately lead to their maturation.”

shrimp
In addition to having religious significance, acaraje is politcally and economically important espcially for women. First sold by women slaves during colonial times, acaraje provided ecomomic means to these Baianas after the abolution of slavery. Historically, the recipes were (and still are) passed from mother to daughter.  So important are acaraje and its surrounding rituals to the culture of Brazil, that the craft has been officially recognized  Institute of Artistic and Historic Heritage  (Iphan),
acaraje lady
Acaraje is not easily made in a home kitchen as the recipe calls for many hard-to-find ingredients. However, if you want to give it a go, you can find recipes on the blog  The Flavors of Brazil (fritters only) and in the book Tasting Brazil by Jessica B. Harris.
*Sources include Wikipedia and Baianas of the Acaraje-a Story of Resistance by Carolina Cantarino.

Leave a comment

Filed under Big Feeds & Feasts, Cooks, Chefs, and Kitchen Hacks, Recipes

Japanese Soul Food in a Dumpling

Screen Shot 2014-01-20 at 11.16.49 PM

One of my favorite books right now is Japanese Soul Cooking: Ramen, Tonkatsu, Tempura, and More from the Streets of Tokyo and Beyond by Tasdashi One and Harris Salat. Gorgeously illustrated, the book  includes 100 recipes for Japanese comfort food that is deeply flavorful and relatively simple to make. This is Japanese home cooking, the kind of food you want to feed your people.  To quote Matt Gross, editor at BonAppetite.com “this book is a joyful and useful exploration of the earthy, fatty, meaty, rib-sicking, lip-smacking fare–the noodles and curries and deep-friend delights that millions of Japanese depend on everyday.” And much of it is good to make in big batches. Our favorite recipes thus far: The Hamburg which is a Japanese style hamburger and the Osaka-Style Okonomayaki which is a pancake griddled with cabbage and pork. I also love the recipe for Battleship Curry which is said to be served every Friday on the Japanese Naval patrol (Navy cooks are famously creative). When I asked the Harris for his favorite dish for big groups he said his go-to dish was gyozas, or japan’s signature dumplings.

“In 2010 I was a stagier at a 400 year old restaurant in Kyoto, a super traditional, historic place that serves kaiseki (the highest expression of Japanese cuisine). When the chef found out I was nuts about gyoza, all the cooks and I gathered in the old kitchen and folded a mountain of them for staff meal. It was fun to eat gyoza in that hallowed place.” Japanese Soul Food Cooking has an extensive section on how to make gyozas and they are especially fun to make WITH your crowd, says Harris “making gyoza together is a blast for grownups, kids, and big groups.”

Big Batch Tips: You might want to make a monster batch of gyoza (double or triple the recipes),  but Harris recommends folding one batch at a time, keeping the second batch of filling in the refrigerator so it stays cold while you are folding the first. (You don’t want the filling to sit on the counter for an hour). You will want to fold all the gyozas before cooking them off. Depending on how many you make and how many guests, you can cook them off or freeze them.
How to Freeze Gyoza:  If you chose to freeze the dumplings, freeze them in nice rows that you can fit in your skillet, so you can easily transfer them to said skillet to cook. These rows are important, because to cook frozen gyozas, you don’t have to defrost. Just follow the cooking instructions below, laying the frozen rows of dumplings directly into your skillet. But increase the cooking time to 8 minutes when the skillet is covered (instead of 4 minutes), for a total cooking time of about 10 minutes.

CLASSIC PORK GYOZA Master Recipe

Here now, the Way of the Gyoza. Refer to the series of photographs, “How to Fold and Cook Gyoza” see below, as you go through this recipe. Once you fold a few thousand gyoza, you’ll get the hang of the technique—we’re kidding. Folding gyoza is pretty easy and you’ll understand it quickly, but remember, it doesn’t have to be perfect. Even if you just pinch the gyoza skins together and dispense with folding the skins like we do in the photos, your dumplings will turn out heavenly. Keep in mind a few things: Chop everything with a knife and do not use a food processor, which will turn the ingredients into mush, not the texture you want. You can use green, savoy, or napa cabbage (green is the default choice). Buy Japanese gyoza skins at Japanese markets; they are round in shape and thinner than their Chinese counterparts (and usually sold frozen; defrost on the counter to room temperature to use). When you cook them, the gyoza might stick together, and that’s totally fine. But you can avoid this by separating the dumplings by about 1/8 inch when laying them in the pan. What you’re looking for in the finished product is beautiful crispy brown bottoms and tenderly steamed tops. See our photos and you’ll know what we mean. Finally, besides the classic dipping sauce we explain in the recipe, these gyoza are also amazing with miso dipping sauce.
Makes about 50 gyoza

3 cups trimmed and finely chopped green cabbage (about 8 ounces)

1⁄2 teaspoon salt

1 1⁄2 cups nira (Japanese green garlic chives), bottom 2 inches trimmed to remove the hard stem, and finely chopped (about 1⁄3 pound)

1 tablespoon finely chopped garlic (about 2 cloves)

1 tablespoon finely chopped ginger (about 1 ounce ginger, peeled)

2⁄3 pound ground pork

2 teaspoons soy sauce

4 tablespoons toasted sesame oil

1⁄2 teaspoon ground black pepper

1⁄2 teaspoon salt

2 teaspoons sugar

2 tablespoons katakuriko (potato starch), plus extra for dusting

50 round gyoza skins, 3 to 4 inches in diameter

1 tablespoon katakuriko (potato starch) mixed with 3 tablespoons warm water

Soy sauce

Japanese rice vinegar

Rayu (page 35)

2⁄3 cup water

To prepare the filling, add the cabbage and salt to a large bowl and thoroughly mix together. Let the cabbage sit at room temperature for 15 minutes. When it’s ready, transfer the cabbage to a clean kitchen towel or large cheesecloth. Roll up the cloth and wring out the liquid in the cabbage, like you’re wringing dry a wet towel. This is a key step so the gyoza doesn’t become watery. Wring out as much liquid from the cabbage as possible. Do this in batches if it’s easier.

Add the wrung-out cabbage, nira, garlic, ginger, pork, soy sauce, 2 tablespoons of the sesame oil, black pepper, salt, sugar, and katakuriko to a large bowl. Use your hands to mix the ingredients together for about 2 minutes. Mash and mush the mixture together, squeezing it through your fingers, so it turns into a sticky filling that will hold together when you spoon it into a dumpling skin.

Screen Shot 2014-01-20 at 11.13.06 PM

Photo credit: Todd Coleman

To make the dumplings, prepare a tray by lightly dusting it with katakuriko. Place a gyoza skin in the palm of one hand with the floured side down. (The skins are sold with one side floured.) Dip a finger in the katakuriko mixed with warm water and wet the entire edge of the skin. This water-starch mixture is the “glue” that will hold the skin closed. Add about 1 tablespoon of the filling to the center of the skin. Use the index fingers and thumbs of both hands to fold the skin and pinch it together. See “How to Fold and Cook Gyoza” (page 32) for step-by-step instructions with photographs. Place the completed gyoza on the tray, fold side up. Repeat until you’ve used up all the filling.

To prepare the dipping sauce, combine the soy sauce, vinegar, and rayu. A classic proportion is 4 parts soy sauce to 2 parts vinegar to 1 part rayu. Adjust to your own taste. Pour the dipping sauce into individual small bowls and set aside.

Screen Shot 2014-01-20 at 11.11.39 PM

Photo credit: Todd Coleman

Photos and recipe from Japanese Soul Cooking: Ramen, Tonkatsu, Tempura, and More from the Streets of Tokyo and Beyond by Tasdashi One and Harris Salat/  Ten Speed Press 2013.

Leave a comment

Filed under Big Feeds & Feasts, Cooks, Chefs, and Kitchen Hacks, Recipes

Party with Pizza Dough! How to Feed a Crowd on the Cheap with The BrokeAss Gourmet

photo (43)

Gabi Moskowitz (aka The BrokeAss Gourmet)  knows how to throw a party on the cheap. One of her secrets: Pizza dough. She made this discovery years ago, when she made a big batch to bring to a party and the host cancelled. What was she going to do with all that dough? It turns out, a lot. The next morning she twisted the dough with butter, cinnamon and sugar to make cinnamon rolls; that night she made naan to go with Indian curry. After that, she made bagels, calzones, empanadas, and more, the recipes for which, are captured in her wonderful new book, Pizza Dough: 100 Delicious, Unexpected Recipes.

Gabi has a lot to celebrate! In addition to her new book, the pilot for her show Young and Hungry was just picked up by ABC Family. The show, loosely based on Gabi’s life and starring Emily Osment is the story of a feisty young blogger who “not only has a true gift for cooking, she has the ability to figure out what people want to eat.”

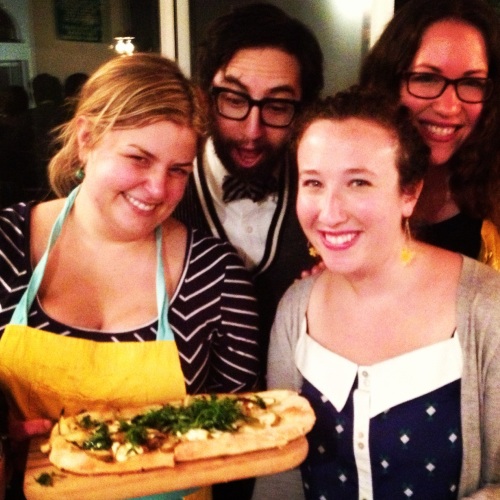
This was certainly true of the book launch party. Gabi arrived at my house with five pounds of dough at 5pm. By the time the guests arrived at 7pm, the table was filled with pinwheels, flatbreads, and kale salad for thirty.  While the guests chatted and ate,  Gabi continued to pull pizzas (and me up after I slipped on a piece of kale). The finale: freshly fried mini-doughnuts rolled in cinnamon sugar.

Illustrated with gorgeous photographs by Frankie Frankeny, the book is both beautiful and practical and will be your go-to for delicious, easy, inexpensive entertaining.

Screen Shot 2014-01-12 at 8.36.38 AM

Published by Egg and Dart Press

Pizza Party Pinwheels 

Gabi used homemade tomato sauce, fresh basil and Provolone to make a big batch of crowd-pleasing pinwheels. But you can use any number of toppings and sauces to suit your taste. This recipe can be easily doubled or tripled and these pizzas are portable so you can bring the party with you!

Yield: Makes 20 pinwheels

Flour for baking and rolling

1 pound pizza dough (either from scratch or store-bought, brought to room temperature)

1 cup sauce (tomato, pesto, red pepper even cooked sweet potatoes pureed with spices like ground chilies or curry powder)

1 cup shredded or crumbled cheese (Provolone, goat, aged white cheddar, fresh mozzarella OR feel free to skip the cheese if you are vegan/dairy-free)

1 to 2 cups toppings  (caramelized diced red onions, spinach or fresh basil or anything you’d put on a pizza, from cooked/raw vegetables to chopped salami or ham–just make sure it’s cut into small, bite-size pieces)

Salt and pepper

1. Preheat the oven to 375°F. Lightly flour a baking sheet and set aside.

2. On a lightly floured surface, roll the pizza dough out into a large rectangle, about 14-by-10 inches and spread the dough with the sauce. Sprinkle the cheese and scatter the toppings over the sauced, cheesed dough (remember not to go too heavy). Top with a light sprinkling of salt and pepper. Roll the dough up the long way, pinching as you go to ensure a tight seal. When you finish rolling the dough, you should have a 10-inch log.

3. Use a sharp knife to slice the log into twenty ½-inch-thick pieces. Lay each slice on the prepared baking sheet.

4. Bake until the crust is golden brown and the filling is bubbly, 18 to 22 minutes. Serve warm or at room temperature.

Leave a comment

Filed under Big Feeds & Feasts, Cooks, Chefs, and Kitchen Hacks, Food Charities, Recipes

What a Combo! Soup and Meatball Gathering for 25

photo (14)

My father will often put two foods together and exclaim “What a combo!”  Sometimes these combinations are brilliant–like potato chips and chocolate and sometimes the combinations are more challenging (usually involving kimchi), but the phrase is used so often in my family that it has become an adjective.

I was thinking about this phrase while deciding what small bite to serve for soup night. My mother suggested the Turkey and Zucchini Burgers with Green Onion and Cumin from Yotam Ottolenghi’s book, Jerusalem. Who doesn’t love a meatball? I thought. And why stop there? In honor of the late Marcella Hazan, I decided to make her classic Meatballs and Tomatoes from The Essentials of Italian Cooking. As my father might say “Soup and meatballs—what a combo!”

My soup gatherings often start small and get bigger until I don’t know how many people are actually coming. I alternate between panic that no one will show  (a scenario that has led to inviting random strangers while running errands) and dread that there is not enough food.  One of the best things about soup is that you can always round it out with bread, cheese, salad or in this case, meatballs.

A forecast of 81 degrees and a case of late summer tomatoes inspired double batches of gazpacho from the Bi-Rite cookbook, Eat Good Food and Joanne Weir‘s Smoked Ham, White Bean, and Tomato Soup from Soup’s On! and triple batches of each kind of meatball. 

Friends brought wine, cheese, and cookies for dessert.  As it turned out, about 25 people showed up and we had enough food (including a few bowls of soup and meatballs leftover for lunch the next day).

Below are the recipes as well as my basic big batch soup and meatball gathering strategy. Do you throw soup gatherings? We would love to hear from you.

What are your favorite “what a combos?!”

meatballsraw

Big Batch Soup and Meatball Party Strategy:

Sunday soup and meatball night:   A an early evening Sunday gathering is a lovely ritual and most importantly, gives you Saturday to prepare.

Soups for all: I recommend making double batches of 2 or 3 kinds of soup–one meaty stew, one vegetable minestrone (usually vegan) and one bean soup. If people offer to bring a soup, always say yes!

Gather your sous-chefs especially small children: It is so much more fun to throw a party with a team–People love to be a part of the action!

Organize your refrigerator: This may seem like a simple step, but clearing out space is essential when throwing any party, especially when making dishes ahead of time.

Shop ahead; make ahead: Chose recipes that can be made ahead of time. I recommend shopping the day before and cooking off at least one soup (preferably a stew that is better the next day). Again, make sure you organize your refrigerator so you have room to keep things overnight. Making food ahead of time leaves more time for worrying that there isn’t enough and gives you the opportunity to make more ;).

What else to serve: Hand held edibles and small bites that don’t don’t require big plates like empanadas,  crostini, polenta squares, flat breads and roasted vegetables.

How to serve: You’ll need bowls of course (mugs will help in a pinch!) and little bamboo/paper plates and stacks of napkins are ideal for small bites. You can set everything out on the table along with mason jars filled with silverware.

Invite your guests participate: I usually ask 2 to 3 people to bring cheese, bread, salumi, and olives and another 2 people to bring simple desserts like cookies (again, no plates!)

photo (7)

JOANNE WEIR’S SMOKED HAM, WHITE BEAN, AND TOMATO SOUP

Joanne’s Weir generously donated include this recipe for our book, Soup’s On! I doubled the amount of beans in her original recipe to make a version that is more like a stew. Deliciously smokey with the flavors of ham and bacon, this soup is an all season go-to!

Weir Smoked Ham Soup

Pick over the beans and discard any damaged beans or stones. Rinse. Put beans in a bowl, add plenty of water to cover, and refrigerate for about 3 hours. Drain the beans and place them in a saucepan with the parsley stems, thyme, bay leaves and cool water to cover by 2 inches. Simmer uncovered until tender, 40 to 50 minutes. Drain the beans, and discard the parsley and thyme stems and bay leaves.

Heat the oil in a soup pot over medium heat. Add the bacon and onion, and cook until the onion is soft, 10 minutes. Add the garlic, and continue to cook 1 minute. Add the stock, ham hocks and tomatoes, and bring to a boil. Reduce the heat to low, and cook until the ham just begins to fall from the bone, about 1 hour. Add the beans, and continue to simmer until the ham falls easily from the bone, about 1 hour more.

Remove the ham hocks and let them cool enough to handle, about 15 minutes. Discard the skin and bones, and cut the ham into 1/2-inch pieces. Add the ham and mint to the soup. Season to taste with salt and pepper.

Ladle the soup into bowls and serve immediately.

photo (15)SERIO’S GAZPACHO

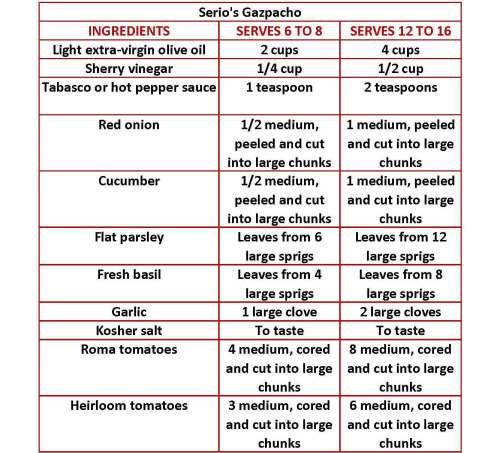
Luscious and flavorful,  this gazpacho from the Bi-Rite Cookbook  Eat Good Food, by Sam Mogannam and Dabney Gough calls for whole tomatoes (no peeling or seeding!) which makes it faster and easier to make for a crowd.  While many gazpacho recipes rely on the addition of bread, this version uses olive oil instead, making it a good alternative for the gluten-free crowd. Use a light olive oil that is not too peppery and the season’s ripest and most flavorful tomatoes.

Serio's Gazpacho

Put the oil, vinegar, and Tabasco in the bowl of a blender and blend briefly. Add the onions, cucumbers, parsley, basil, garlic, and 3 tsp. salt and blend until smooth. With the blender running, add the tomatoes a few at a time. When the blender is about 3/4 full, pour out half of the liquid into a medium bowl. Continue to puree and add the tomatoes a few at a time until all the tomatoes are incorporated and the mixture is smooth. Pour the blender contents into the bowl and stir to blend.

If you want a super-smooth texture, pass the soup through a fine mesh strainer.

Chill for at least 2 hours before serving. Whisk to blend, then taste and add more salt or vinegar as needed.  Garnish each serving with a drizzle of extra virgin olive oil.

TURKEY AND ZUCCHINI BURGERS WITH GREEN ONIONS AND CUMIN

These herb and spice-laden meatballs  from Jerusalem by Yotam Ottolenghi and Sami Tamimi will change your life. They are easy to make in big quantities, just make sure you don’t crowd the pan when searing in batches.   To make a richer burger, use ground dark meat. If you do not have sumac to make the yogurt sauce, it is still delicious without.
Sumac Sauce

First make the sour cream sauce by placing all of the ingredients in a small bowl. Stir well and set aside or chill until needed.

Turkey Zucchini Burgers

Preheat the oven to 425 degrees F/220 degrees C. In a large bowl combine all the ingredients for the meatballs except the sunflower oil. Mix with your hands and then shape into about 18 burgers, each weighing 1 ½ ounces/45 grams.

Pour enough sunflower oil into a large frying pan to form a layer about 1/8 inch/2mm thick on the pan bottom.  Heat over medium heat until hot then sear the meatballs in batches on all sides. Cook each batch for about 4 minutes, adding oil as needed until golden brown.

Carefully transfer the seared meatballs to a baking sheet lined with waxed paper and place in the oven for 5 to 7 minutes or until cooked through. Serve warm or at room temperature.

photo (5)

TOMATOES AND MEATBALLS

This meatball recipe from Essentials of Classic Italian Cooking by Marcella Hazan, is a great project to do with lots of people, especially with kids who enjoy (and are often quite skilled at) rolling the balls in the bread crumbs. 

Tomatoes and Meatballs

Trim away the bread crust, put the milk and bread in a small saucepan and turn on the heat to low.  When the bread has soaked up all the milk, mash it to a pulp with a fork.  Remove from heat and allow to cool completely.

Into a bowl put the chopped meat, onion, parsley, the egg, the tablespoon of olive oil, the grated Parmesan, a tiny grating of nutmeg – about 1/8 teaspoon – the bread and milk mush, salt, and several grindings of black pepper.  Gently knead the mixture with your hands without squeezing it.  When all the ingredients are evenly combined, shape it gently and without squeezing into balls about 1 inch in diameter.  Roll the balls lightly in the bread crumbs.

Choose a saute pan that can subsequently accommodate all the meatballs in a single layer.  (or cook them in two batches) Pour in enough vegetable oil to come 1/4 inch up the sides.  Turn on the heat to medium high and when the oil is hot, slip in the meatballs.  Sliding them in with a spatula will avoid splashing hot oil out of the pan.  Brown the meatballs on all sides, turning them carefully so they won’t break up.

Remove from heat, tip the pan slightly and with a spoon, remove as much of the fat as floats to the surface. Return the pan to the front burner over medium heat, add the chopped tomatoes with their juice, a pinch of salt, and turn the meatballs over the meatballs over once or twice to coat them well. Cover the pan and adjust the heat to cook a quiet but steady simmer for about 20 to 25 minutes until the oil floats free of the tomatoes. Taste, correct for salt, and serve.

davia
peeps

Leave a comment

Filed under Big Feeds & Feasts, Cooks, Chefs, and Kitchen Hacks, Recipes

Feast of the Momo—How to make Nepalese Dumplings for a Crowd

IMG_2736

momo and filling

The day we met Bini Prathan, owner of Bini’s Kitchen  at La Cocina, she had just finished making 15,000 momos (Nepalese dumplings) for the San Francisco Street Food Festival. Big batch cooking is in Bini’s blood. Born in Nepal, her mother cooked for the Nepalese royal family in the 1960s and big gatherings were the norm. “A typical party at my house was 160 to 180 people, it wasn’t unusual to have 35 people over for dinner.”

Whether for a party of for a mid-week dinner, friends and family would gather in the kitchen to cook together  “It’s how you catch up on the days events. It’s one of the things you love to do together.” When she was a child, she and her friends would run to her house from school because everyone knew there would always be good food. Nowadays, Bini counts on her assistant Sopa who is from Tibet as well as family members to help with big events. But she doesn’t have much trouble convincing people to help, even some of her clients have joined in the fun,  “They like to be a part of it.”

Big gatherings are typical in Nepal where it is said “the Nepalese people observe more festivals than there are days in a year. There are different festivals celebrated to honor Hindu and Buddhist gods and goddesses and others to recreate important events from ancient mythology and epic literature.”  Bini is looking forward to the Dashian, a religious festival that lasts for 15 days at the end of October.  For this festival, her family would cook a goat and buffalo and make curry with chicken and “whatever else was possible.” Usually 100 to 250 people would come to that event.

Bini went to culinary school in Mumbai before moving to San Francisco and joining La Cocina’s business incubation program nearly a year ago. Her menu includes sumptous curries, dahls, rotis and other Nepalese specialties including her beloved momos.

Also found in Tibet, Bhutan, Sikkim, and other parts of India, a momo is a type of steamed or fried dumpling that boast numerous variations of filling. Bini’s specialties include turkey, lamb, and cabbage (vegetarian).  She says the secret to her momos is her spice mixture that includes spices she brings back from Nepal.

Folding a momo is like making pleats for a fan. It takes a bit of practice and technique shown here by  Sopa.

sopa copy

happy bini

The little hole in the top is for putting in the sauce.

momo closeup

Bini says that when you eat a momo, it is important to grasp the top with all 5 fingers  and place the whole dumpling in your mouth. “God gave you 5 fingers. When you eat with your hands you are saying thank you to god; when you lick your fingers you are serene from the inside, and this means you are feeding your soul, not just your stomach.” 

Cooking  For  Crowd Strategy: As noted above, having lots of eager volunteers is the best way to make momos for a crowd. For steaming the dumplings, if you don’t have an industrial scale steamer (!!), Bini recommends the Asian stacked steamers in which you can steam 20 to 30 at a time. For big gatherings you will need a dedicated person to steam the dumplings in batches.

Serving a Crowd Strategy: At big events, Bini spoons about 8 momos per person into little paper boat bowls.  For the sauce, pour into plastic bottles with squirt tops for more fun and easier service.

Bini’s Turkey Momos

Bini recommends using a sturdy round dumpling wrapper.  She prefers Nasoya round wrappers which come in packs of 60.  For the filling,  you can add spices to taste; fry a little pinch to test the flavoring before you stuff the wrapper.

momo grid

*Note that the proportion of spices is to taste. To test your filling fry up a pinch and taste it before you stuff your dumplings. Also each pack of Nagoya round wrappers includes 60 wrappers, so count on 1 pack per batch.


1.  Combine the filling ingredients in a large bowl and mix gently until all the ingredients and spices are evenly disbursed. Try to handle as little as possible.

2. To fill each dumpling, place a table spoon of filling in the center of each wrapper and gather the edges together pasting with little water. Fold, wrap and pleat to make neat joint for each individual momo leaving a little “well” at the top.

 3.  Take a tray spray it with nonstick spray and place each wrapped momos in a row and put it in a freezer until ready to cook.

4.  To steam the momos,  fill the steamer to the half-point half  with water and boil. Place a colander (steamer) on top of the vessel and grease it with nonstick spray.

 5.  Lightly spray each momo with oil and place on the greased colander leaving inch between each momo .Cover the steamer with lid and steam for 15  minutes.

 6.  Serve steaming hot momos with spicy tomato cilantro sauce. Recipe follows:

Spicy Tomato Cilantro Sauce

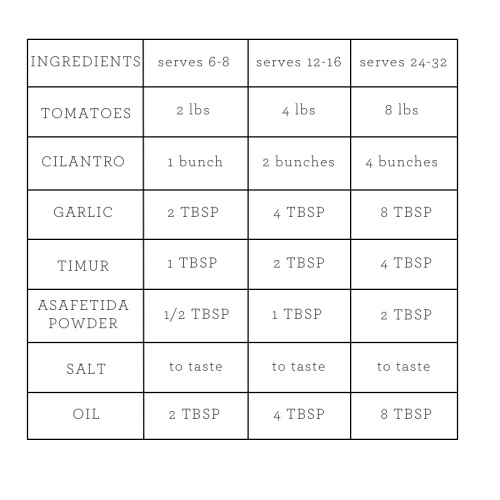
This recipe calls for a Nepalese spice called timur which is available online. If you can’t find, it just leave it out.  If you are making a big batch, it is helpful to place sauce in bottles with a squirt top for easier serving.

momo sauce grid (1)

1. Heat the oven to 400 degrees F.

2. In a baking sheet,  roast the tomatoes for about 3-5 minutes.  Set aside to let cool.

3.  Place all of the ingredients in a blender or a food processor  (roasted tomatoes, cilantro, garlic, timur, asafetida powder, salt and oil). and process until the sauce is smooth and light orange in color.

IMG_2733

Leave a comment

Filed under Big Feeds & Feasts, Cooks, Chefs, and Kitchen Hacks, Food Charities, Recipes

Focaccia di Recco or How to Attach Yourself to Someone Else’s Dinner Party and Bask in the Reflected Glory–Plus Bagna Cauda

table

My no-fail strategies for a throwing a big dinner party: 

1. Always invite people to your party who are better cooks than you.

2. Attach yourself to someone else’s dinner party (obviously a very good cook) to learn and capture reflected glory.

The key is cultivating a community of great cooks—an overall strategy that makes for a long and happy life.

Last week I volunteered to help in the kitchen at Belcampo Farm in Shasta valley where my amazing friend Anya Fernald  was hosting a dinner party for 20 people.

photo (22)

Prior to running Belcampo, Anya had worked for Slow Food Italy and her cooking reflects a strong Northern Italian influence. Cooking with us that day were two other amazing Belcampo cooks: Gavin Erezuma and Bronwen Hannah-Korpi.  While Gavin grilled top round and butterflied chickens, I helped Anya prepare the appetizers—bagna cauda (a rich dip made with anchovies, garlic and olive oil) and focaccia di Reccio (a crispy stuffed flat-bread from Liguria).

Well, the truth is that I  actually only peeled the garlic (10 heads!) while Anya, Bronwen, and Gavin skillfully put the meal together. I watched and took notes on how to properly de-bone an anchovy and stretch dough to paper-thin consistency.  My main helpfulness, however, was that I generously offered to serve the food (and thus, bask in the glow of it all).  Melted cheese oozed out of the focaccias as Anya placed, cut, and stacked them on a rustic wood platter.

As I expected, the guests had high praise for the food and thanked me profusely!  “You are so welcome!” I said, “It’s my pleasure!”

What are you serving at your next party? Need some help?

photo (24)

Now walk the party with tray in hand.
Everyone will say “Thank you!” Just smile and say, “You are so welcome!”

Focaccia di Recco

Stuffed with tangy cheese, Focaccia di Recco is a thin-crusted flat bread from Liguria near Genoa. It tastes nothing like the thick chewy bread we think of as focaccia (it is not made with yeast) and is instead crispy and rich with the flavors of olive oil, salt and melted cheese.

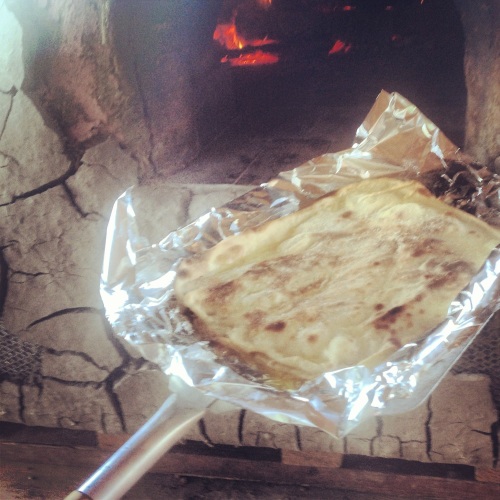
Gavin prepped the dough about an hour and a half before the party and  we (well, really Anya) assembled and baked the focaccias ahead of time, timing the last 2 or 3 to arrive hot out of the oven during the first hour of the party. Focaccia di Recco is usually made in round pans but we made our on a square baking sheet. Also, we had access to a wood burning stove but the instructions here provide for a conventional oven.  Also a high quality olive oil is a must. For the cheese, you can also use Fontina.

*Also, please note that we (well, Anya and Gavin really) used metric measurements. The conversions listed below are estimates.

focaccia grid (3)

Place the flour in a large bowl or a mixer with a dough hook.  Add a pinch of salt the cold water and extra virgin olive oil. Start mixing the dough (with a fork if by hand, incorporating the flour, little by little).  Once the dough has come together, start kneading it with your hands.

Knead the dough for 5 to 10 minutes, until smooth and uniform. It should be pliant and soft. When the dough is ready, cover it with plastic wrap and let it rest for 1 hour at room temperature.

Place a pizza stone on the middle rack of the oven and preheat  to 475 degrees F.

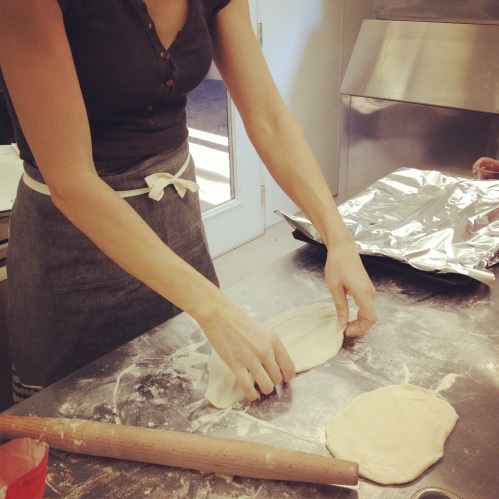
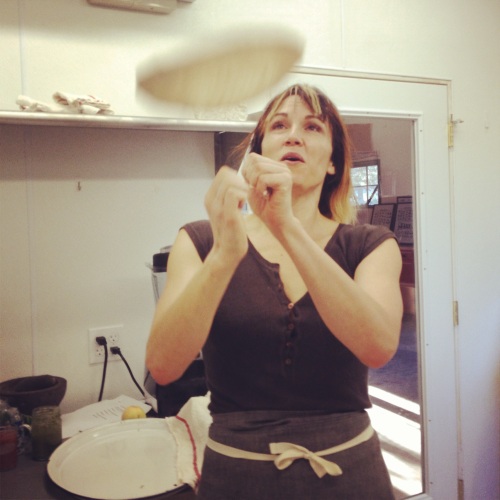
For the smaller batch (4 focaccias) divide the dough into 8 balls; for the the bigger batch (8 focaccias)  divide the the dough into 16 equal parts. Using a rolling pin, roll out the dough and then shape with your hands trying to keep it round and gently stretching until the sheet is as thin as possible, almost transparent.  Once you have rolled out the pieces of dough, begin assembling the focaccia di Recco.

photo (12)

flyingdough

Grease a 10-in baking dish with extra virgin olive oil or line a baking sheet with tin foil (also greased with oil). Making one focaccia at a time, place one layer of dough on the bottom of the dish or baking sheet. Add the cheese in pieces using your hands or a spoon. Cover the cheese with the second sheet of dough. Party Strategy note here: We recommend assembling and baking off half of the focaccia before the party and finishing the rest just before/during the party. 

photo (26)Pinch the edges together to make a seal. Poke or pinch holes into the top layer of dough so that the steam can come out during cooking.  Brush with extra virgin olive oil and sprinkle generously with coarse sea salt.

Place in hot oven and bake on a pizza stone until dark golden brown, about 10 to 12 minutes or more depending on your oven.

outofoven

Remove it from the oven and let cool slightly. Cut it into squares and serve warm.

Bagna Cauda

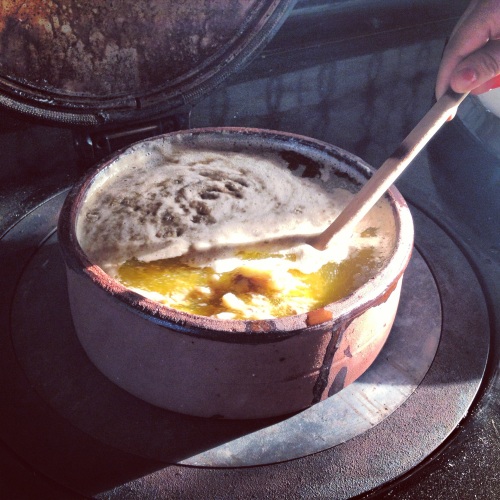
Bagna Cauda literally translates to “hot bath” or “hot dip.”  Made with olive oil, garlic and anchovies, it is so good you might want to bathe in it! When eaten as a meal, it is served in individual portions in special bowls equipped with heating candles.  When making it for this crowd however, we (well, Anya really) served it as a dip with plenty of fresh fennel, carrots, and other fall roots. Unlike a green salad, these sturdy vegetables won’t wilt. Anya recommends using salt packed anchovies and a very high quality olive oil. If you don’t want to use butter, you can substitute an additional 2 cups of olive oil instead.

bagacauda

In a bowl, soak the salted anchovies in water for 30 minutes. Remove the anchovies from the water, mince and grind with a mortar and pestle or in a food processor.

Meanwhile place the garlic in a saucepan and cover with the milk and simmer over medium low heat until the garlic is soft, about 10 minutes.  Strain the garlic and rinse in cold water. Set aside.

Place the garlic, anchovies, olive oil, and butter in a medium saucepan and cook over very low heat for 1 hour. Do not boil.

Remove from heat and run the mixture through a food mill on the widest mesh or press it through a sieve with a spatula. Pour into a serving bowl and place among a bounty of fresh vegetables.

photo (13)

1 Comment

Filed under Big Feeds & Feasts, Cooks, Chefs, and Kitchen Hacks, Recipes

Back to School Bento Boxes or How My Boyfriend Became a Japanese Housewife

photo 88This isn’t a post about a big batch food but it is a about a big batch of something else.

On a recent staycation in Japantown, my boyfriend bought a how-to book about bento boxes. The cover featured a grid of crazy cute animals made out of assorted edibles.

“Miel will LOVE this book!” he said, pointing to a little rice tiger.

Screen Shot 2013-08-12 at 4.50.44 PM

The next night I found him making cheese bunnies with a set of special cookie cutters he had bought in the Daiso store. He carefully placed a pink ham nose and nori whiskers using tweezers, “Specially made for this! “ he told me.

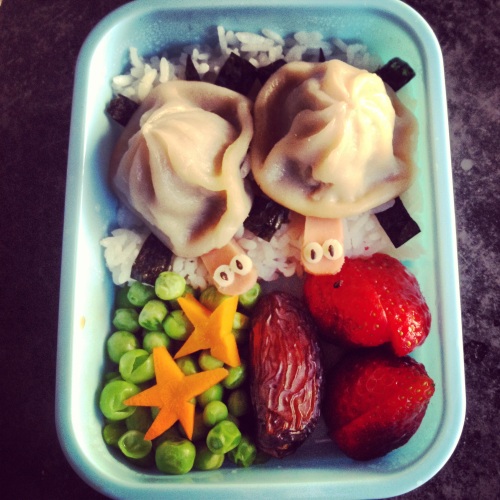
From then on, making bento boxes has been his nightly ritual. My favorite so far has been angry kitty, but I also loved the owl he pressed out of baloney, a pair of dim sum tortoises and a butterfly with spotted wings made from boiled carrots. He surrounds the animals with bits of broccoli, strawberries and other leftovers to round out the landscape, “for a balanced diet, ” he says.

photo (7)

photo (11)

And Miel? She knows she is one of the luckiest 6 year olds in town. I think, like me, her favorite part is sitting at the counter watching her dad make his masterpieces—little lunchbox dioramas filled with love.

Leave a comment

Filed under Cooks, Chefs, and Kitchen Hacks

Vodka and Latkes

It’s my biggest scam:  Every year, I invite my mother to my vodka and latke party.

“I’m going out of town,” she tells me. “I can’t make the latkes this year.”

“Ok, Mom,” I say, “Have a great trip.”

Ten days later she calls me,  “I’ve made 180,” she says, “how many people are coming?”

photo (60)

My mom is the latke fairy.  She is my secret strategy for throwing an excellent party.   I find the location, invite the people, and she shows up with my father and a massive cooler.

Many purists would disagree with her process of freezing off batches and that she uses a food processor, but if they had one of her crispy, golden pancakes sizzling hot out of the oven, they might change their minds. Also the alternative of standing over the stove frying for 2 at a time is not as fun as feeding seventy-five happy people.  We serve our latkes with bowls of sour cream, apple sauce, wild smoked salmon, and braised brisket.

Then for the vodka:  My dad’s dear Russian friend taught us this tradition: First you exhale and take a shot; inhale while eating the pickle and yell “Whooooo!”

Here is to celebrating the potato in all its forms!

Latkes

My mother’s recipe is a variation on Marlene Sorosky’s version in Fast & Festive Meals for the Jewish Holidays.  When making latkes for a big group of people, my mother makes batches of 25 at a time and freezes them in resealable plastic bags. It is a lot of work, so she might make 4 batches over a month. Then she reheats them in a hot oven the night of the party.

  • 2 tablespoons hot tap water
  • 1 vitamin C tablet, crushed into a powder
  • 2 1/2 pounds peeled russet potatoes
  • 1 peeled yellow onion
  • 2 tablespoons matzo meal
  • 2 large eggs, lightly beaten
  • 1 teaspoon kosher salt, plus more as needed
  • 1/4 teaspoon baking powder
  • Vegetable oil, for frying
  • Applesauce and/or sour cream, for serving (optional)

Mistaking my mother’s latke preparing expertise for my own, I agreed to do this video for CHOW.com with then senior producer Meredith Arthur.

  1. Place the water and vitamin C tablet in a large bowl and stir until the vitamin C is dissolved; set aside.
  2. Shred the potatoes through the shredding blade of a food processor. Remove the shredded potatoes and fit the food processor with the blade attachment. Working in batches, return the potatoes to the food processor and pulse until they are the size of rice grains. Add the potatoes to the vitamin C mixture and stir to combine.
  3. Shred and pulse the onion in the food processor using the same method as with the potatoes. Add to the bowl of potato mixture along with the matzo meal, eggs, measured salt, and baking powder and stir until incorporated.
  4. Pour 1/4 to 1/2 inch of the oil into a large frying pan and heat over medium-high heat. Once the oil is hot enough to fry (you can check by sticking a wooden utensil into the oil and seeing if bubbles form around the edges), use a large spoon to drop 3 to 4 mounds of the potato mixture (about 2 generous tablespoons each) into the hot oil. Do not crowd the pan. Flatten the latkes slightly with the back of the spoon.
  5. Fry until golden brown, about 2 to 3 minutes per side. Remove the latkes to paper towels to drain and season with additional salt. Repeat with the remaining batter. When you reach the end of the batter, pat the mixture with a paper towel to remove any excess liquid before frying.
  6. Serve immediately or to freeze: Let cool completely and store in between wax paper in large sealable bags. Store in freezer.
  7. To reheat frozen latkes: Preheat over to 425 degrees F.  Let latkes thaw for 20 minutes. Place latkes on cookie sheet and bake until hot and sizzling, about 10 minutes.

Leave a comment

December 1, 2012 · 5:50 am