Soup for Syria

Screen Shot 2015-09-03 at 4.23.34 PM

A timely and meaningful cookbook to aid Syrian refugees, Soup for Syria contains a collection of recipes contributed by international chefs; moreover profits will be donated to help fund food relief efforts for Syrian refugees via the United Nations Refugee Agency, UNHCR.

The book isn’t out yet but an  article in Publishing Perspectives by Olivia Snaije tells the moving story behind the creation of the book by Lebanese writer and photographer Barbara Abdeni Massaad:

“Lebanese food writer and photographer Barbara Abdeni Massaad lives in the Bekaa Valley close to where nearly half a million Syrian refugees subsist in camps. Unable to ignore the situation, Massaad writes in Soup for Syria’s introduction that she began to visit the refugee camps throughout last winter, each time filling her car trunk with food. “After several trips, I got to know many of the families…the more I visited—the more stories I heard and the more desperation I witnessed—the more heartbroken I became. I was determined to help no matter what. Are we not all human beings seeking the same things for our families—love, food and shelter?”

Already the author of three cookbooks, Massaad worked with publisher Michel Moushabeck of Interlink Books to invite renowned chefs and cookbook authors to be a part of the book. Anthony Bourdain, Alice Waters, Paula Wolfert, Claudia Roden, Sami Tamimi and Yotam Ottolenghi all donated recipes and stories. With such soups as Claudia Roden’s Borlotti Bean and pasta soup and  Greg Malouf’s fennel soup with lemon and cinnamon, Feed Your People is hoping to host a Soup for Syria Supper soon.  As Anthony Bourdain writes, “Soup is elemental, and it always makes sense, even when the world around us fails to.”

Leave a comment

Filed under Food Charities

A Musical Feast: The Tanglewood Picnic and a Recipe for Whisky Sours that serves 106!

Tanglewood.Cover

As summer turns to fall, it is time to celebrate with at least one last giant picnic. If you are looking for inspiration, you will find it in The Tanglewood Picnic: Music and Outdoor Feasts in the Berkshires, a book that honors this grand tradition since its beginnings in 1937.

If anything brings people together as much as food, it is music. In Tanglewood these two traditions are intertwined. Each summer, 120,000 music lovers flock to the Boston Symphony Orchestra’s summer home in Lenox, Massachusetts, to picnic during concerts.   Over the years, attendees have been serenaded by some of the world’s greatest musicians including  Leonard Bernstein, Aaron Copeland, Yo-Yo Ma and many popular artists including James Taylor.

In the old days, simple picnics of sandwiches, soda, and cookies from Blue Heaven Turkey Farm, Samel’s Deli, and Angelina’s Subs were the norm. Al fresco dining at Tanglewood took a gourmet turn in the 1970s and ’80s with the establishment of Nejaime’s Wine Cellars, Crosby Catering, and Guido’s Fresh Marketplace. Nowadays everything goes–from casual grab-and go-sandwiches, paper napkins, and finger foods to fancy fixings complete with lace tablecloths, candelabras, and crystal goblets. Many picnickers have their own picnic food and drink traditions—from lobster sliders to signature cocktails.

Author Gina Hyams moved to the Berkshires ten years ago and became enchanted with the grand Tanglewood picnic ritual—how it’s both fancy and populist. She loves the magic of “lying on the picnic blanket and watching the moon rise and the stars come out as music fills the air.”

Like a beloved family heirloom, the tradition of picnicking at Tanglewood is passed down through generations. While researching this book, Gina met countless people who were first introduced to Tanglewood as children and who now share the experience with their own children and grandchildren.

Gina has written 12 books, but this is the first she has published under her imprint, Muddy Puppy Media. She  wrote and published the book as a kind of “collective love-letter” to the tradition of Tanglewood picnics. The book contains 150 photographs of picnickers from the 1940s through the present from the Boston Symphony Orchestra Archives and from audience members’ family scrapbooks, plus a dozen classic recipes and the ultimate picnic checklist of tips compiled from expert Tanglewood picnickers. Gina says about the book, “I hope it serves as both a tribute to past picnics and as an inspiration for future ones.”

Happy picnicking!

The Tanglewood Picnic: Music and Outdoor Feasts in the Berkshires by Gina Hyams. Published by Muddy Puppy Media 2015.

Country Curtains Tanglewood Picnic Whiskey Sour Punch

Yields approximately 106 servings

Country Curtains has held its annual employee Christmas party at Tanglewood since 1968. Company founders Jane and Jack Fitzpatrick established the “Christmas at the Pops” tradition because they thought the December holiday season was so packed with parties, Christmas in the summertime would be a treat. They decorated their Tanglewood company picnics with red and green balloons, holiday napkins, and candles—a custom that continues today. Sometimes, even Santa and Mrs. Claus join the festivities.

2 1/2 gallons water

2 (24-ounce) packages Timmy’s sweet and sour cocktail mix

3 (12-ounce) cans of Minute Maid frozen lemonade concentrate

3 (1.7-liter) bottles of Seagram’s whiskey

Garnish

About 12 oranges, cut into half-moon shaped slices

3 (16-ounce) jars of Haddon House maraschino cherries

Ice

Pour all of the ingredients into a large insulated beverage jug and stir with a long spoon. Fill a punch bowl with ice, punch, oranges, and cherries. Add additional orange slices and cherry garnishes to each serving as needed.

Leave a comment

Filed under Big Feeds & Feasts, Recipes

Yucca Alchemy: Chewy, Cheesy, Brazilian Cheese Rolls (Pão de Queijo)


IMG_4940 (1)

From My Rio de Janeiro: A Cookbook, by Leticia Moreinos Schwartz, published by Kyle Books, 2013.


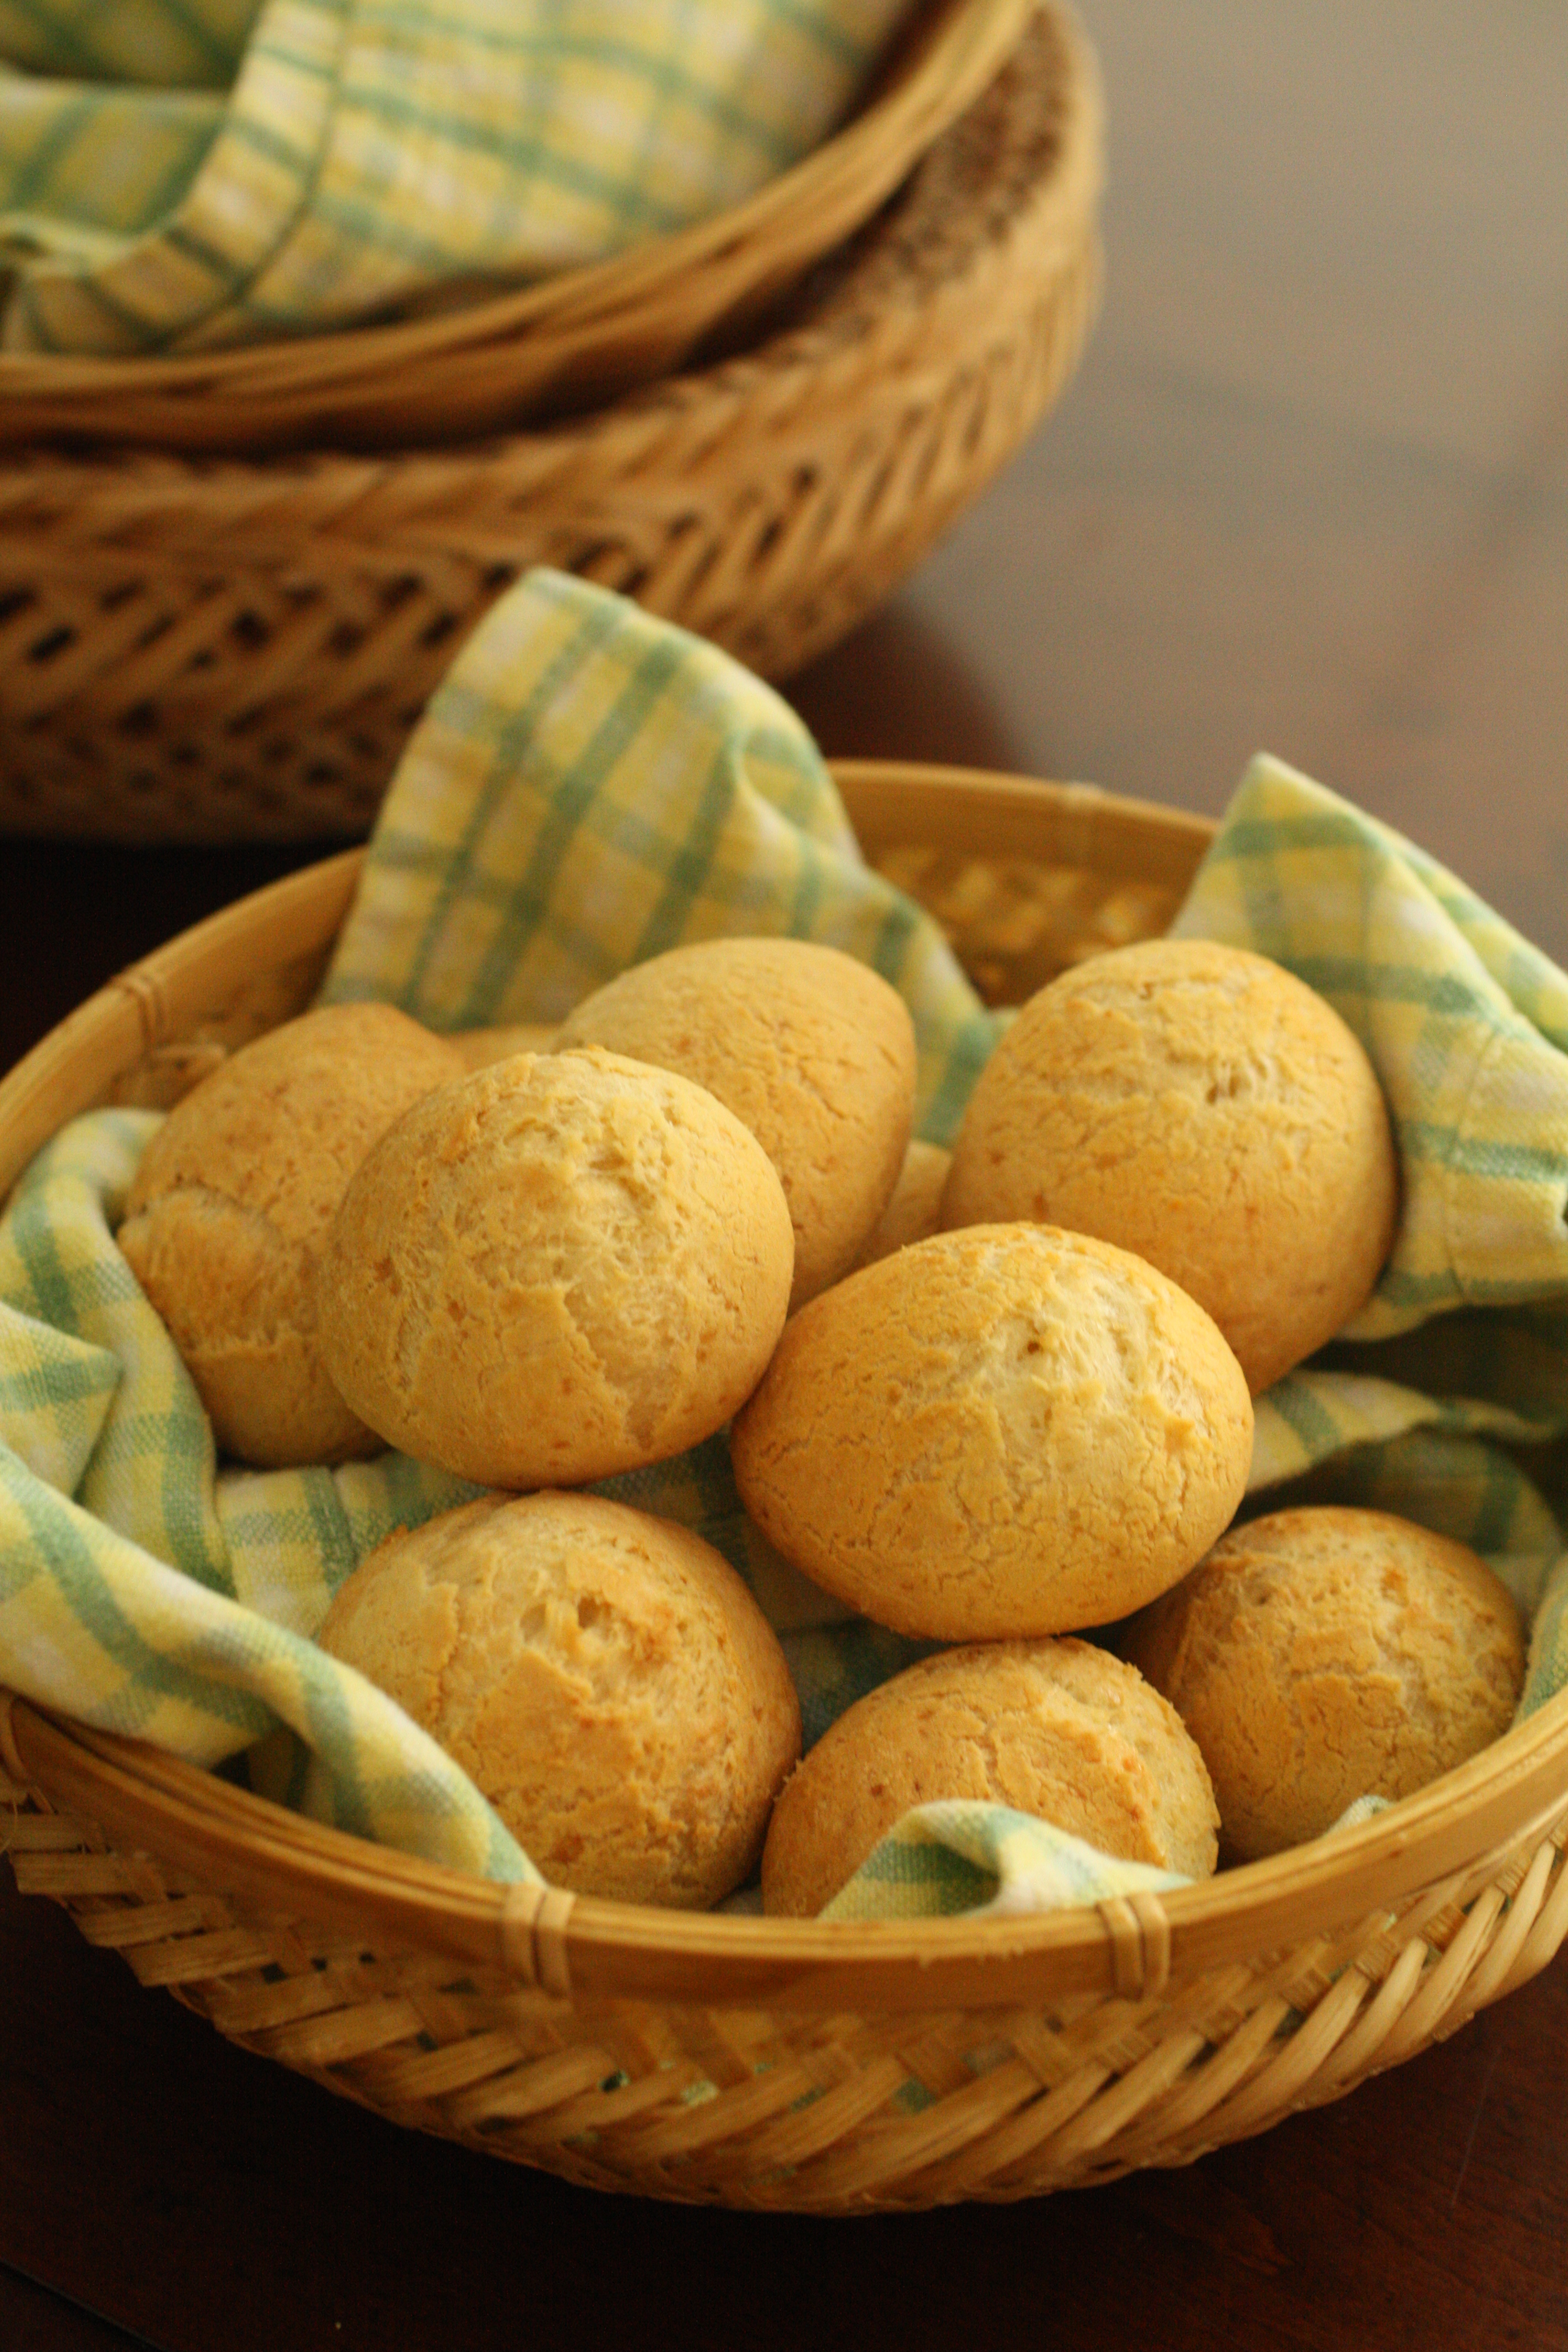
Since I returned from Brazil, I have been obsessed with pão de queijo or Brazilian cheese rolls. In search of the best recipe, I turned to chef and cookbook author Leticia Moreino Schwartz,  who has been making pão de queijo since  she was a little girl.   In her wonderful book, My Rio de Janeiro: A Cookbook, Leticia aptly describes pão do queijo as a “golf sized little roll that is chewy, cheese, and steamy, almost succulent…the result of yucca alchemy…. it’s quite difficult to eat just one.”

Made with sour manioc (tapioca) starch which is extracted from yucca (aka manioc or cassava),  Pão de queijo is the national bread of Brazil and can be found all over the country; eaten at all times of the day:  slathered with butter for breakfast; enjoyed with cup of coffee for an afternoon snack, or served as a side with dinner. When I asked Leticia to tell me a story about a time she made it for a celebration she said ” I make pão de queijo for every party!”

Pão de queijo is ideal to make for big gatherings because the dough can be easily made ahead and frozen in big batches.  “This is what made it viable to take the little cheese ball from our grandmother’s oven to a global scale,” she said adding, “Today pão de queijo is available all over the world!” You can buy mixes or pre-made and frozen in many different flavors. But of course, the best are made at home and eaten “one minute after they come out of the oven.”

Big Batch Notes: The best way to make pão de queijo for a crowd to make the dough ahead of time,  roll it into balls and put on a sheet pan to freeze (lined with parchment paper or silpat). Once the balls are frozen, place them into a plastic bag.  Then shortly before the event, you can bake the rolls directly from the freezer for about 12-20 minutes (depending on the oven and the size of your rolls) until puffy and golden brown.

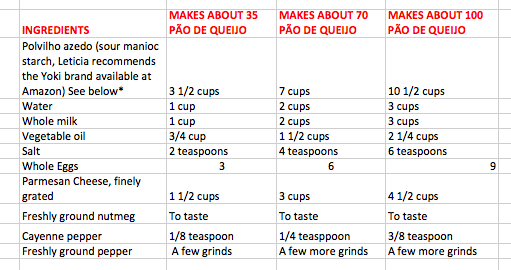
Special ingredients: The secret ingredient is povilho azedo also known sour manioc starch, different from sweet manioc starch.  Although I have made mine with tapioca starch, to make truly authentic pãao de queijo you will need to use this ingredient, for which there is no American brand but can be easily purchased on available on Amazon.  Leticia recommends the Yoki brand. (For more information about this ingredient, see below).


final RIO US front cover (1)

Pão de Queijo

Recipe by Leticia Moreinos Schwartz

Brazilians have a fierce love affair with pão de queijo. From Belém do Pará in the north of the country to Rio Grande do Sul, in the south, and anywhere in between, pão de queijo has the power to ignite conversations and direct dinner habits.

In Rio, you will find pão de queijo all over town. Accompanied by a cafezinho on a side in the middle of the afternoon, this habit definitely keep cariocas happy. Another common way of finding pão de queijo is in restaurants, especially in churrascarias, pão de queijo is served in a little basket as part of the couvert. That alone can change the destiny of your menu ordering. If that basked is full of a precious one, the restaurant owner should think twice about serving it. At Esplanada Grill, a fine churrascaria in Ipanema, I have to do a little bit of transcendental meditation before a visit since their pão de queijo is simply spectacular! That’s the inspiration for this recipe.


Screen Shot 2014-04-15 at 1.21.27 PM

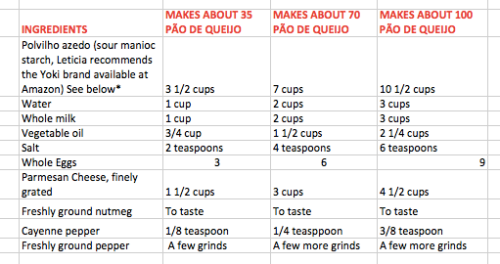
1.     Place the manioc starch in the bowl of an electric mixer fitted with the paddle attachment. Set aside.

2.     Place the water, milk, oil, and salt in a small saucepan, and bring to a boil. Immediately pour the hot liquid mixture in one stroke into the starch and turn the machine on at low speed. Mix until the dough is smooth and starch is all incorporated, about 2 minutes. Pause the machine and add the eggs. Continue to paddle at low speed until the dough develops structure and turns pale yellow about 5 minutes. The dough will feel sticky.

3.     Add the cheese and mix until well incorporated.

4.     Season to taste with nutmeg, cayenne, and freshly ground pepper.

5.     Transfer the dough to a bowl, cover with plastic wrap, and chill for at least 2 hours in the refrigerator.

6.     Preheat the oven to 350˚F. Line a baking sheet with parchment paper.

7.     Wet your hands with olive oil (alternatively, you can flour your hands with manioc starch) and use an ice cream scooper to make 1-inch balls, rolling them with your hands. Place them on the baking sheet, leaving about 11Ž2 to 2 inches between each (you can freeze them at this point by storing them in a zip-lock bag for up to 3 months).

8.     Bake the cheese rolls in the oven until they puff up and look lightly golden brown, about 12 to 14 minutes. To ensure even baking, rotate the pan once during baking time.

9.     Remove the baking sheet from the oven and place the rolls in a basket lined with a nice cloth. Serve immediately while they are still at their warmest and chewiest.


*Manioc (Tapioca) Starch

Manioc Starch (povilho doce) and sour manioc starch (povilho azedo) are both extracted from yucca (aka manioc or cassava). When it comes to manioc and tapioca starch, it can get very confusing because different American brands call these products different names.

Povilho Doce (manioc starch or sweet manioc starch):

Goya calls it Tapioca Starch, but Bob’s Red Mill calls it Tapioca Flour, and I call it manioc starch in this book.

Povilho Azedo (sour or fermented manioc starch):

No American brand makes the Brazilian equivalent of sour manioc starch (at least not yet), so when a recipe calls for this ingredient, do not substitute for an American brand. I recommend Yoki or Gloriasul brands both available on Amazon.

Farinha de mandioca (manioc flour):

Although this flour is also extracted from the yucca vegetable, the process is completely different from making starch. Here, the yucca vegetable is not washed but ground, then squeezed in a cloth to eliminate any vegetable juices, sieved, and lightly toasted. Think of it as breadcrumbs. Farinha de mendioca is used to make another important staple of Brazilian cuisine: farofa.


Leave a comment

Filed under Big Feeds & Feasts, Cooks, Chefs, and Kitchen Hacks, Recipes

How I Redeemed My Lack of Love for Matzo Balls by Making a Kick-Ass Orange and Almond Cake for Passover

passover


My family makes fun of me on Passover because I don’t like matzo balls. “How can you NOT like matzo balls?” someone will ask at which point my mother will say that I am not her biological child. My cousin doesn’t mind. She sits next to me and loots my bowl.

But I finally redeemed myself by making the best Passover dessert ever–Claudia Roden’s Orange and Almond Cake from her book  A Book of Middle Eastern Food  (Vintage Books, A Division of Random House) .  According to Claudia, Sephardic Jews in Spain and Portugal (lands of citrus!) have been baking this cake since (at least) the 14th century. And when you taste it, you’ll know why!  Made with ground almonds instead of flour and whole boiled oranges, the cake is flavorful, rich, butter-less, gluten-free and impossible to botch:  Says Claudia “These moist rather flat cakes, half pudding half cake never fail. If they are undercooked, they make a fine desert with cream. They are far too moist ever to be over cooked or dry up.”

Why this is a great cake to make for a crowd:   1) It is SO easy to make  2) It requires only 5 (readily available!) ingredients 3) It can be made ahead 4) It can be plated and served quickly and 4) This is one of the most delicious cakes EVER.

Big batch cooking tips: The recipe for the cake can be doubled or even tripled but you may need to puree the oranges in batches depending on the size of your food processor.  As noted above, the cakes are very moist and can be made up to 2 days ahead of time, wrapped in plastic and stored at room temperature. You can also cook the oranges a day ahead of cooking the cake which will save you time as well.

Claudia Roden’s Orange and Almond Cake

This is the original recipe from the book with  slight edits for style (changing the word “pips” to seeds though pips is a great word!). As noted above, you will need to set aside 2 hours to boil the oranges. When making the cake for Passover, she recommends dusting the pans with finely ground matzo meal instead of flour. Serve with a big dollop of lightly sweetened whipped cream.


Screen Shot 2014-04-09 at 5.27.38 PM

Wash and boil the whole (unpeeled) oranges in water to cover for nearly 2 hours. Let them cool, then cut them open and remove the seeds. Puree the oranges in a food processor. Preheat oven to 400 degrees F. Beat the eggs in a large bowl. Add the remaining ingredients, including the orange puree, and mix thoroughly and pour into a buttered and floured (or matzo meal dusted) cake tin, with a removable base if possible. Bake for one hour, or until a knife inserted in the center comes out clean. Cool in the tin before turning out.


boiling oranges


oranges


orange cake

Leave a comment

Filed under Big Feeds & Feasts, Recipes

Brazilian (Bahian) Balls of Fire

acaraje in hand

During Carnaval, in the town of Salvador in Bahia Brazil,  people literally dance in the streets. The city is filled with the sounds of Brazilian pop music and Afro-Brazilian rhythms–Diana Mercury, Lepo Lepo, Olodun, mixed in with a little Michael Jackson and Daft Punk. At makeshift stands, Bahians grill skewered meat, toast cheese sticks, and slather corn on the cob with butter. Street food is how you feed your people during a festival that runs for 5 days (and nights!) and attracts over 2 million revelers.

All over the city, ladies wearing white dreses and head wraps (aka Baianas) sell acarajé (Portuguese pronunciation: ( listen)), a fritter made from black-eyed peas deep and fried in palm oil often split and stuffed with shrimp, chopped tomatoes, stewed okra and super-spicey hot sauce. The dish originated in West African, brought to to Brazil during the slave trade.  The name comes from the Yoruba language âcara (ball of fire) and je (to eat), hence to eat a ball of fire. 

frying acarajes

Acaraje is a sacred food, one of the  traditions of Candombléan Afro-Brazilian religion. While the religion is far too complex to describe here,* there is one powerful God  Oludumaré who is served by less powerful deities called orishas, each embodying different natural forces and human characteristics.  Candomble is largely an oral tradition and practiced in secret, so the descriptions and names for the orishas vary (and can be confusing) but according to one source acarje is the ritual food of lansa, “the orisha of the winds, hurricanes and tempests who lives at the gate of the graveyard, and has dominion over the realm of the Dead.”  In another ritual,  the first cake is offered to Èṣù “the spirit of chaos and trickery who leads mortals to temptation and possible tribulation in the hopes that the experience will ultimately lead to their maturation.”

shrimp
In addition to having religious significance, acaraje is politcally and economically important espcially for women. First sold by women slaves during colonial times, acaraje provided ecomomic means to these Baianas after the abolution of slavery. Historically, the recipes were (and still are) passed from mother to daughter.  So important are acaraje and its surrounding rituals to the culture of Brazil, that the craft has been officially recognized  Institute of Artistic and Historic Heritage  (Iphan),
acaraje lady
Acaraje is not easily made in a home kitchen as the recipe calls for many hard-to-find ingredients. However, if you want to give it a go, you can find recipes on the blog  The Flavors of Brazil (fritters only) and in the book Tasting Brazil by Jessica B. Harris.
*Sources include Wikipedia and Baianas of the Acaraje-a Story of Resistance by Carolina Cantarino.

Leave a comment

Filed under Big Feeds & Feasts, Cooks, Chefs, and Kitchen Hacks, Recipes

Kale, Enough Already? Never! Tangy Kale Salad with Sunflower Seeds for a Crowd

kaleforcrowdMaybe by now you have had enough kale. Maybe you are on to some other cruciferous vegetable. But if you are looking for a salad to feed a crowd, kale salad is the best. I recently made it for the Gabi’s Pizza Dough Party and it was a hit for the following reasons: 1) Unlike most salads you can make it ahead of time 2) It can sit at room temperature for hours and actually gets better 3) It is fantastically easy and 4) Pecorino cheese, garlic and lemon juice–what a combo!

Raw Kale Salad With Pecorino and Sunflower Seeds

This recipe is essentially a big batch version of Melissa Clarke’s recipe for Raw Tuscan Kale Salad with Pecorino originally published in the New York Times with with minor alterations and substitutions. It was my mother’s idea to swap out the breadcrumbs for the sunflower seeds.  If you want to get fancy,  you can use pine nuts but they can be costly especially when you are making a large quantities. You can also substitute Parmesan for Pecorino but you will need to add more salt to taste.

The actual serving amount may vary depending on the size of your kale bunches and what else is on your menu. When I made this salad for Gabi’s party, I used 3 bunches but there was so much other food, it was enough to feed 20 people.

Screen Shot 2014-02-10 at 12.34.51 PM

1. Trim bottom off bottom 2-inches of kale stems and discard. Slice kale into 3/4-inch-wide ribbons. Place kale in a big bowl.

2. Using a mortar and pestle, pound garlic and salt into a paste. Transfer garlic to a small bowl. Add the cheese, olive oil, lemon juice, pepper flakes and black pepper, and whisk to combine. Pour dressing over kale and use your hands to thoroughly combine (dressing will be thick and need lots of tossing to coat leaves).

3. Let salad sit for 5 to 10 minutes, then toss with sunflower seeds and top with additional grated cheese.

1 Comment

Filed under Big Feeds & Feasts, Recipes, Sustainable Eating

Japanese Soul Food in a Dumpling

Screen Shot 2014-01-20 at 11.16.49 PM

One of my favorite books right now is Japanese Soul Cooking: Ramen, Tonkatsu, Tempura, and More from the Streets of Tokyo and Beyond by Tasdashi One and Harris Salat. Gorgeously illustrated, the book  includes 100 recipes for Japanese comfort food that is deeply flavorful and relatively simple to make. This is Japanese home cooking, the kind of food you want to feed your people.  To quote Matt Gross, editor at BonAppetite.com “this book is a joyful and useful exploration of the earthy, fatty, meaty, rib-sicking, lip-smacking fare–the noodles and curries and deep-friend delights that millions of Japanese depend on everyday.” And much of it is good to make in big batches. Our favorite recipes thus far: The Hamburg which is a Japanese style hamburger and the Osaka-Style Okonomayaki which is a pancake griddled with cabbage and pork. I also love the recipe for Battleship Curry which is said to be served every Friday on the Japanese Naval patrol (Navy cooks are famously creative). When I asked the Harris for his favorite dish for big groups he said his go-to dish was gyozas, or japan’s signature dumplings.

“In 2010 I was a stagier at a 400 year old restaurant in Kyoto, a super traditional, historic place that serves kaiseki (the highest expression of Japanese cuisine). When the chef found out I was nuts about gyoza, all the cooks and I gathered in the old kitchen and folded a mountain of them for staff meal. It was fun to eat gyoza in that hallowed place.” Japanese Soul Food Cooking has an extensive section on how to make gyozas and they are especially fun to make WITH your crowd, says Harris “making gyoza together is a blast for grownups, kids, and big groups.”

Big Batch Tips: You might want to make a monster batch of gyoza (double or triple the recipes),  but Harris recommends folding one batch at a time, keeping the second batch of filling in the refrigerator so it stays cold while you are folding the first. (You don’t want the filling to sit on the counter for an hour). You will want to fold all the gyozas before cooking them off. Depending on how many you make and how many guests, you can cook them off or freeze them.
How to Freeze Gyoza:  If you chose to freeze the dumplings, freeze them in nice rows that you can fit in your skillet, so you can easily transfer them to said skillet to cook. These rows are important, because to cook frozen gyozas, you don’t have to defrost. Just follow the cooking instructions below, laying the frozen rows of dumplings directly into your skillet. But increase the cooking time to 8 minutes when the skillet is covered (instead of 4 minutes), for a total cooking time of about 10 minutes.

CLASSIC PORK GYOZA Master Recipe

Here now, the Way of the Gyoza. Refer to the series of photographs, “How to Fold and Cook Gyoza” see below, as you go through this recipe. Once you fold a few thousand gyoza, you’ll get the hang of the technique—we’re kidding. Folding gyoza is pretty easy and you’ll understand it quickly, but remember, it doesn’t have to be perfect. Even if you just pinch the gyoza skins together and dispense with folding the skins like we do in the photos, your dumplings will turn out heavenly. Keep in mind a few things: Chop everything with a knife and do not use a food processor, which will turn the ingredients into mush, not the texture you want. You can use green, savoy, or napa cabbage (green is the default choice). Buy Japanese gyoza skins at Japanese markets; they are round in shape and thinner than their Chinese counterparts (and usually sold frozen; defrost on the counter to room temperature to use). When you cook them, the gyoza might stick together, and that’s totally fine. But you can avoid this by separating the dumplings by about 1/8 inch when laying them in the pan. What you’re looking for in the finished product is beautiful crispy brown bottoms and tenderly steamed tops. See our photos and you’ll know what we mean. Finally, besides the classic dipping sauce we explain in the recipe, these gyoza are also amazing with miso dipping sauce.

Makes about 50 gyoza

3 cups trimmed and finely chopped green cabbage (about 8 ounces)

1⁄2 teaspoon salt

1 1⁄2 cups nira (Japanese green garlic chives), bottom 2 inches trimmed to remove the hard stem, and finely chopped (about 1⁄3 pound)

1 tablespoon finely chopped garlic (about 2 cloves)

1 tablespoon finely chopped ginger (about 1 ounce ginger, peeled)

2⁄3 pound ground pork

2 teaspoons soy sauce

4 tablespoons toasted sesame oil

1⁄2 teaspoon ground black pepper

1⁄2 teaspoon salt

2 teaspoons sugar

2 tablespoons katakuriko (potato starch), plus extra for dusting

50 round gyoza skins, 3 to 4 inches in diameter

1 tablespoon katakuriko (potato starch) mixed with 3 tablespoons warm water

Soy sauce

Japanese rice vinegar

Rayu (page 35)

2⁄3 cup water

To prepare the filling, add the cabbage and salt to a large bowl and thoroughly mix together. Let the cabbage sit at room temperature for 15 minutes. When it’s ready, transfer the cabbage to a clean kitchen towel or large cheesecloth. Roll up the cloth and wring out the liquid in the cabbage, like you’re wringing dry a wet towel. This is a key step so the gyoza doesn’t become watery. Wring out as much liquid from the cabbage as possible. Do this in batches if it’s easier.

Add the wrung-out cabbage, nira, garlic, ginger, pork, soy sauce, 2 tablespoons of the sesame oil, black pepper, salt, sugar, and katakuriko to a large bowl. Use your hands to mix the ingredients together for about 2 minutes. Mash and mush the mixture together, squeezing it through your fingers, so it turns into a sticky filling that will hold together when you spoon it into a dumpling skin.

Screen Shot 2014-01-20 at 11.13.06 PM

Photo credit: Todd Coleman

To make the dumplings, prepare a tray by lightly dusting it with katakuriko. Place a gyoza skin in the palm of one hand with the floured side down. (The skins are sold with one side floured.) Dip a finger in the katakuriko mixed with warm water and wet the entire edge of the skin. This water-starch mixture is the “glue” that will hold the skin closed. Add about 1 tablespoon of the filling to the center of the skin. Use the index fingers and thumbs of both hands to fold the skin and pinch it together. See “How to Fold and Cook Gyoza” (page 32) for step-by-step instructions with photographs. Place the completed gyoza on the tray, fold side up. Repeat until you’ve used up all the filling.

To prepare the dipping sauce, combine the soy sauce, vinegar, and rayu. A classic proportion is 4 parts soy sauce to 2 parts vinegar to 1 part rayu. Adjust to your own taste. Pour the dipping sauce into individual small bowls and set aside.

Screen Shot 2014-01-20 at 11.11.39 PM

Photo credit: Todd Coleman

Photos and recipe from Japanese Soul Cooking: Ramen, Tonkatsu, Tempura, and More from the Streets of Tokyo and Beyond by Tasdashi One and Harris Salat/  Ten Speed Press 2013.

Leave a comment

Filed under Big Feeds & Feasts, Cooks, Chefs, and Kitchen Hacks, Recipes

Sausages, Sauerkraut and How Good Food Leads to Great People: A Community Dinner at 18 Reasons

IMG_6001It was a Wednesday night and I had no plans. “A night all to myself with no where to be!” I thought gleefully. But when I came home to an empty house and a few meager plastic containers of cold pasta, my delight turned to despair.  I texted a few friends but everyone was busy. All dressed up with no place to go! But then I remembered reading about a Community Dinner at 18 Reasons.

Based in the San Francisco Mission across the street from the Bi-Rite Market, 18 Reasons is a community cooking school and so much more. Each month they offer a $10 community dinner featuring local producers. On the menu that night were Fatted Calf  sausages and homemade sauerkraut made by 18 Reason’s Executive Director, Sarah Nelson. I arrived to find about forty happy eaters seated together at long wood tables– from Mission hipsters to families with kids. 
IMG_6012Whether you are passionate about cooking, sharing a meal with friends, or learning about the food system, 18 Reasons has something for everyone. Their motto is “empowering your discovery of good food” which is exactly what they do through gamut of events and classes that engage  eaters, drinkers, cookers and crafters across the good food spectrum. Some of the most popular classes include a Basic Knife Skills (sells out every month!) and classes on the exotic (Flavors of Azerbaijan) to the fundamental (Whole Grain Primer) all taught by Chef Michelle McKenzie. Their film and lecture series includes both fun and serious food topics, from a screening of Babette’s Feast to a discussion of what it takes to be a farmer.  They also reach over 2,000 low-income families each year through their Cooking Matters program, a cooking and nutrition course that teaches adults, kids, and teens how to plan, shop for, and prepare delicious, healthy meals on a limited budget. Volunteer chefs and nutritionists contribute thousands of hours each year to the program, which is offered at partner sites throughout the Bay Area. Check out their full calendar and their schedule of Cooking Matters classes.
Through eating good food together, we discover our community. Our sausage and sauerkraut dinner felt like a big family feast with a bunch of long lost relatives. Of course the food was delicious, but even more so was the little girl who sat next to me. Now when I have a free night, I’ll know where I’m welcome: The next community dinner is on Wednesday, Jan. 29. The menu: Buttermilk Waffles, Benton’s Bacon, with Bourbon Barrel Matured Maple Syrup. Hope to see you there!

IMG_6014

Leave a comment

Filed under Big Feeds & Feasts, Food Charities

Party with Pizza Dough! How to Feed a Crowd on the Cheap with The BrokeAss Gourmet

photo (43)

Gabi Moskowitz (aka The BrokeAss Gourmet)  knows how to throw a party on the cheap. One of her secrets: Pizza dough. She made this discovery years ago, when she made a big batch to bring to a party and the host cancelled. What was she going to do with all that dough? It turns out, a lot. The next morning she twisted the dough with butter, cinnamon and sugar to make cinnamon rolls; that night she made naan to go with Indian curry. After that, she made bagels, calzones, empanadas, and more, the recipes for which, are captured in her wonderful new book, Pizza Dough: 100 Delicious, Unexpected Recipes.

Gabi has a lot to celebrate! In addition to her new book, the pilot for her show Young and Hungry was just picked up by ABC Family. The show, loosely based on Gabi’s life and starring Emily Osment is the story of a feisty young blogger who “not only has a true gift for cooking, she has the ability to figure out what people want to eat.”

This was certainly true of the book launch party. Gabi arrived at my house with five pounds of dough at 5pm. By the time the guests arrived at 7pm, the table was filled with pinwheels, flatbreads, and kale salad for thirty.  While the guests chatted and ate,  Gabi continued to pull pizzas (and me up after I slipped on a piece of kale). The finale: freshly fried mini-doughnuts rolled in cinnamon sugar.

Illustrated with gorgeous photographs by Frankie Frankeny, the book is both beautiful and practical and will be your go-to for delicious, easy, inexpensive entertaining.

Screen Shot 2014-01-12 at 8.36.38 AM

Published by Egg and Dart Press

Pizza Party Pinwheels 

Gabi used homemade tomato sauce, fresh basil and Provolone to make a big batch of crowd-pleasing pinwheels. But you can use any number of toppings and sauces to suit your taste. This recipe can be easily doubled or tripled and these pizzas are portable so you can bring the party with you!

Yield: Makes 20 pinwheels

Flour for baking and rolling

1 pound pizza dough (either from scratch or store-bought, brought to room temperature)

1 cup sauce (tomato, pesto, red pepper even cooked sweet potatoes pureed with spices like ground chilies or curry powder)

1 cup shredded or crumbled cheese (Provolone, goat, aged white cheddar, fresh mozzarella OR feel free to skip the cheese if you are vegan/dairy-free)

1 to 2 cups toppings  (caramelized diced red onions, spinach or fresh basil or anything you’d put on a pizza, from cooked/raw vegetables to chopped salami or ham–just make sure it’s cut into small, bite-size pieces)

Salt and pepper

1. Preheat the oven to 375°F. Lightly flour a baking sheet and set aside.

2. On a lightly floured surface, roll the pizza dough out into a large rectangle, about 14-by-10 inches and spread the dough with the sauce. Sprinkle the cheese and scatter the toppings over the sauced, cheesed dough (remember not to go too heavy). Top with a light sprinkling of salt and pepper. Roll the dough up the long way, pinching as you go to ensure a tight seal. When you finish rolling the dough, you should have a 10-inch log.

3. Use a sharp knife to slice the log into twenty ½-inch-thick pieces. Lay each slice on the prepared baking sheet.

4. Bake until the crust is golden brown and the filling is bubbly, 18 to 22 minutes. Serve warm or at room temperature.

Leave a comment

Filed under Big Feeds & Feasts, Cooks, Chefs, and Kitchen Hacks, Food Charities, Recipes

A Pot of Soup for Pops

photo (42)

When the going gets tough, the tough get cooking,” I repeated to myself as I drove down Highway 280 to my parents house. My dad was down with a tooth ache.  My mother was taking him to the dentist, so my plan was to make a pot of chicken soup for them to share when they returned. I was grateful to have a jar of homemade stock leftover from a huge batch I made earlier in the week. The hard part of this story is that original reason for making the stock was to bring to a dear friend who had lumpectomy.  It feels like one of those “bad” times when my people aren’t feeling so good.

It’s during these “bad” times, that I head to the kitchen to cook. I may not be able to solve the problem, but I can make soup. And the truth is, there is much comfort in the cooking, especially for the cook.  This is why I regularly make big batches of stock to keep in the freezer. Once I have stock,  any number of soups can be made depending on the who, the where, and the why, or it can be simply served as is with a little salt.

For the chicken soup, I sauteed finely chopped onions and carrots, then added a little salt and poured in the stock. I let it simmer until the broth was flavorful and slightly sweet, then added chopped chicken thigh meat and Italian parsley. Once the chicken was cooked through, I turned off the heat and left the pot of soup on the stove for my parents to find when they got back from the dentist’s office.

As the tough cooks say “I will be back.”

Tough Girl Chicken Stock

The longer you cook the stock the more flavorful it becomes. I prefer to use chicken wings because they make a rich, flavor broth that doesn’t much straining. The addition of lots of carrots make slightly sweet stock, however, if your taste is more savory, you can substitute celery for half carrots.

Makes 12 to 13 cups

4 to 5 pounds chicken parts, preferably wings and necks

1 large onion, peeled

5 large carrots,  chopped

2 bay leaves

15 to 20 parsley sprigs or stems

Salt and pepper to taste

1. Place all the ingredients in a large stock pot with about 4 quarts (16 cups) of water.

2. Turn the heat to high and bring to a boil. Lower the heat to simmer. Cook, skimming any foam for 1 1/2 to 2 hours, taste-testing with a little salt.

3. Turn off the heat and let cool. Use a ladle to skim off some of the fat that has risen to the top (or you can do this after refrigerating the finished stock). Strain and discard the remaining solids.

4. Season with salt and pepper to taste.

5. Use the stock immediately or refrigerate for up to 3 days. To freeze, let cool and pour into ziplock bags or into jars (leaving room at the top). It will keep in your freezer for up to 3 months.  

Leave a comment

Filed under Big Feeds & Feasts, Recipes, Sustainable Eating